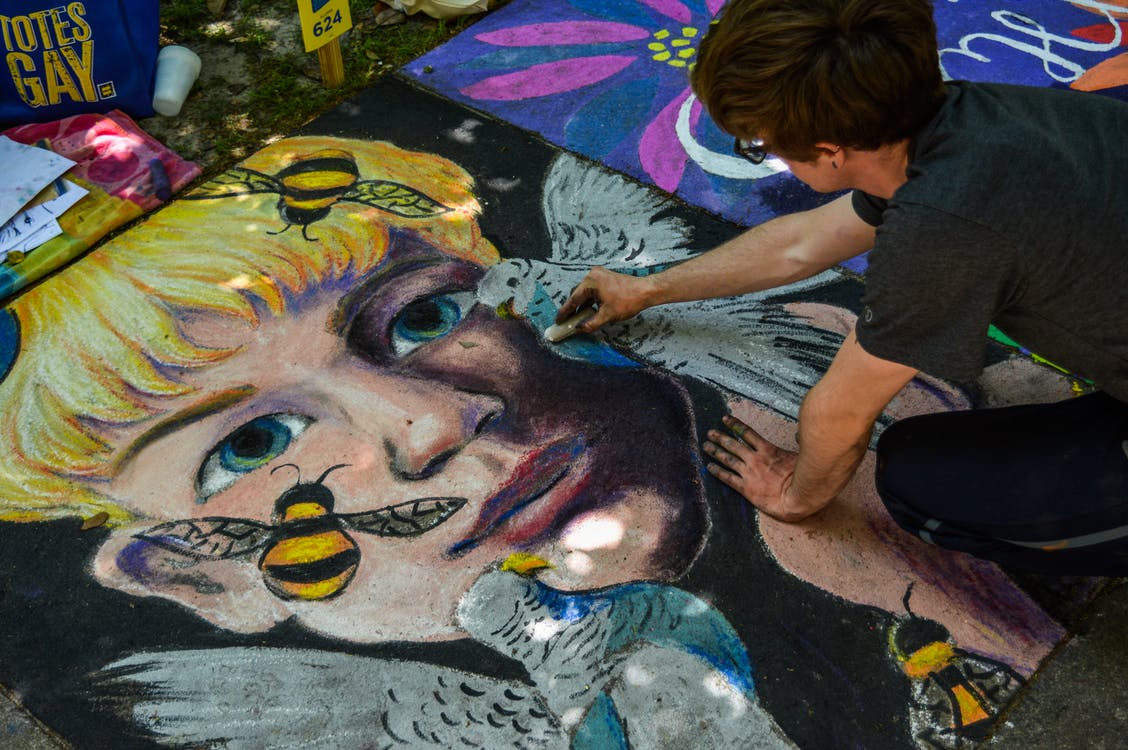
Drawing on paper is fun, but chalk art is on another level of fun! There’s so much more room to play with when you’re drawing outside. The world is your canvas and the only limit is your imagination.
Chalk art is a fun and easy activity that can take up a few hours of your day. If you’re trying to find something to do with kids, then this activity can help them unplug from their devices.
Plus, the necessary supplies aren’t expensive at all. You can get started with only a few bucks! And once you’re done, clean-up only takes a few minutes.
So read on to learn how to make chalk art! We break down some advanced techniques to help you unleash your inner artist and make an impression on anyone walking by.
Supplies
You don’t need too many supplies to get started. But you will need a few items. And there are some optional supplies that’ll help you improve your artwork.
- Baby wipes to help you clean your hands
- A small container for water
- A yardstick to make drawing straight lines easier
- A sponge to help you erase any mistakes
- Painter’s tape to make drawing easier
And of course—chalk!
Let’s go over some of the best chalk for sidewalk art.
The Best Chalk for Sidewalk Art
Chalk, like a paintbrush or pencil, can be used to create beautiful pieces of art. But unlike other art forms, you don’t need to invest too much money into the tools you use to create that art.
Finding good chalk isn’t difficult. A nice set should have multiple colors. They’re supposed to be sturdy with a nice weight to them. If a set comes in an easily portable container, then that’s the cherry on top. Here are some of the best sets around.
JOYIN Sidewalk Chalk
This set from Joyin comes with 160 pieces of sturdy, reliable chalk. There are 16 different colors to use.
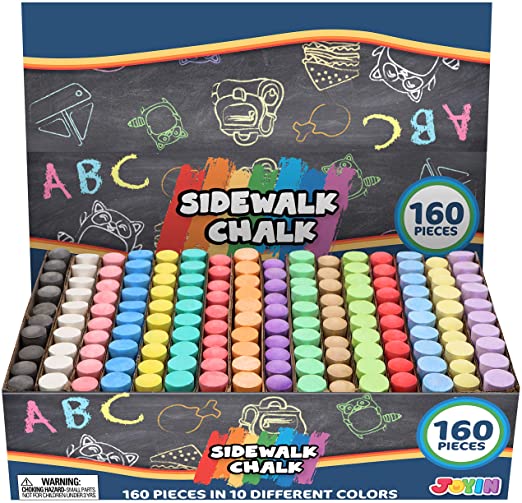
The colors are vibrant and the set is fun to use. However, we would recommend putting the pieces into a container with a handle. The set doesn’t come in a portable storage container.
Click here to buy this chalk off Amazon.
Crayola Washable Sidewalk Chalk
This is the best set for kids. This iconic brand has reliable art supplies for any and all creative endeavors.
The set goes above and beyond with 24 colors! There is a ton of fun to be had with this set. You only get one of each color, but the chalk is sturdy and nicely made.
The 24 pieces even come nicely packaged in a convenient carrying case.
Click here to visit the set’s Amazon page.
If your little artist has a grand idea in their little head, then you should check out the 48-piece set with 48 different colors! Click here for that option.
Prismacolor Premier Nupastel Firm Pastel Color Sticks
If you’re looking for more sophisticated materials, then this set has got you covered.
These pastels are perfect for blending over outdoor surfaces.
12 pieces in 12 different colors come in this easily portable box.
Click here to check out the set on Amazon!
The Grid Technique
The grid technique is an easy way to create beautiful pieces of art. The best thing about it is that you don’t have to be a professional artist to create jaw-dropping work with this technique. Let’s go over the few simple steps.
1. Find a reference photo and grid it
With the grid technique, you can make professional-looking art by finding inspiration from other artists, or even from the real world. Find a painting or photo you like.
Then, you’re going to draw a few lines throughout the photo. Do this vertically and horizontally. The lines should be evenly spaced and run throughout the entire photo.
2. Draw a grid on the floor
Determine how long and wide you want each square on the photo to be on a larger grid. For example, a square on paper could translate to a foot long and a foot wide on the ground.
Draw a grid on the floor following your determined scale. Use the yardstick to help you draw straight lines.
3. Follow the reference photo to draw
Now, you’re going to look at the reference photo and carefully recreate what you see. Use the lines as a guide. It’s not so much about recreating the photo and more about recreating the shapes you see in each square.
You could use painter’s tape to make coloring in the lines simpler and quicker.
Try not to focus too much on being perfect. That won’t make things fun!
Advanced Techniques
There are some advanced techniques that can take your art to the next level. They’re not too hard to do, either. They just need some practice. Let’s go over them!
Shading. Shading can be accomplished by applying pressure with the chalk to make darker colors. Try to have all your shading point in the same direction. Don’t be excessive about it, just enough to make it look detailed when you’re looking at the whole thing.
Blending. Blending makes the whole picture look a lot smoother and more realistic. You shouldn’t do this excessively, either. But when done just right—blending could make it all easier on the eyes. Shade an area with one color, then use another color to “blend” the two colors together. It serves as a bridge between the two colors.
Wetting the chalk. If you put a piece of chalk into a water container for about 6 minutes, then the tip should soften a little. This allows for the color to come right off the chalk like it’s paint. This makes blending a whole lot easier and makes the colors pop.
Erasing. If you soak a sponge in some water, then you could erase any mistakes. Be sure to be careful with the water as it might splash around and stain the artwork.
Final Thoughts
And there you have it! Now you know how to make chalk art. It’s a fun activity that can help you bring your friends and family outside for a few hours.
One of the best parts about chalk art is hosing down the artwork to start again and make something new!