Bringing a room to life is a long effort. Most of the work is putting down furniture and any essentials. But if you want to go the extra mile and impress any guests that visit, then you need to hang a picture or two.
Hanging a picture is a lot easier said than done. At first glance, you might just want to start hammering away and hope for the best. If your wall survives that attack, then the picture will be slanted or off-center.
Time to get rid of those bare walls and take your room to the next level! Read on to learn how to hang a picture in 5 easy steps.
1. Find the Perfect Spot
It would be a good idea to plan out where you want the picture before doing anything permanent. Consider the weight and size of your picture.
You have to consider your wall type in order to correctly hang things. If you have drywall, then you might need to drill into a stud or use a drywall anchor for stability. If you have plaster walls, then you’ll need to create a pilot hole in your wall with a drill/driver before inserting screws or nails. If you have wood panel walls, then consider using either thin nails or screws—they leave small holes but are strong enough to support a picture. If you have a brick wall, then you’ll want to hammer nails into the mortar rather than the brick itself.
Be artistic with it, too! Interior designers say that it’s best to hang your pictures at eye-level. This allows you and any guests to appreciate that picture without making it a chore to look at it. Try not to place it too close to any shelves or windows. A chair or sofa below the picture would be fantastic.
2. Get Your Supplies
Now that you’ve figured out the perfect spot, you’re going to need your supplies. Here are the supplies that you’ll need:
- Framed artwork or framed photo
- Hammer or drill
- A level or measuring tape
- Picture hanging hooks or nails or screws or hangers
- Pencil
This set from Her Hardware has everything you might need for hanging a picture. It includes a hammer, a level, picture hangers, picture hanging hooks, and more.
If you’re hanging a light-weight piece, then you can use nails.
If you’re going to put a medium-weight picture on the wall, then you should use picture-hangers.
A heavier piece will need bigger nails, a stud-finder or wall-plug anchors with screws that fit them.
Check the back of your framed print. It might already have a pair of hangers or a wire.
If there’s nothing on the back of your picture, then you’re going to have to figure out how to get your picture hanging onto the wall. It’s important to consider the weight of your print.
3. Prepare the Picture Frame
If your picture doesn’t have anything on the back of it, just a wooden frame, then you’ll have to prepare it for hanging. If there’s already something on the back of your frame, then feel free to skip this step.
D-Rings and Wire
D-rings and wire are a great way to hang a medium-weight picture. Measure the total height of the picture frame with a ruler or tape measure. Divide that measurement by three in order to place the D-ring one-third of the way down from the top. Do this for both sides.
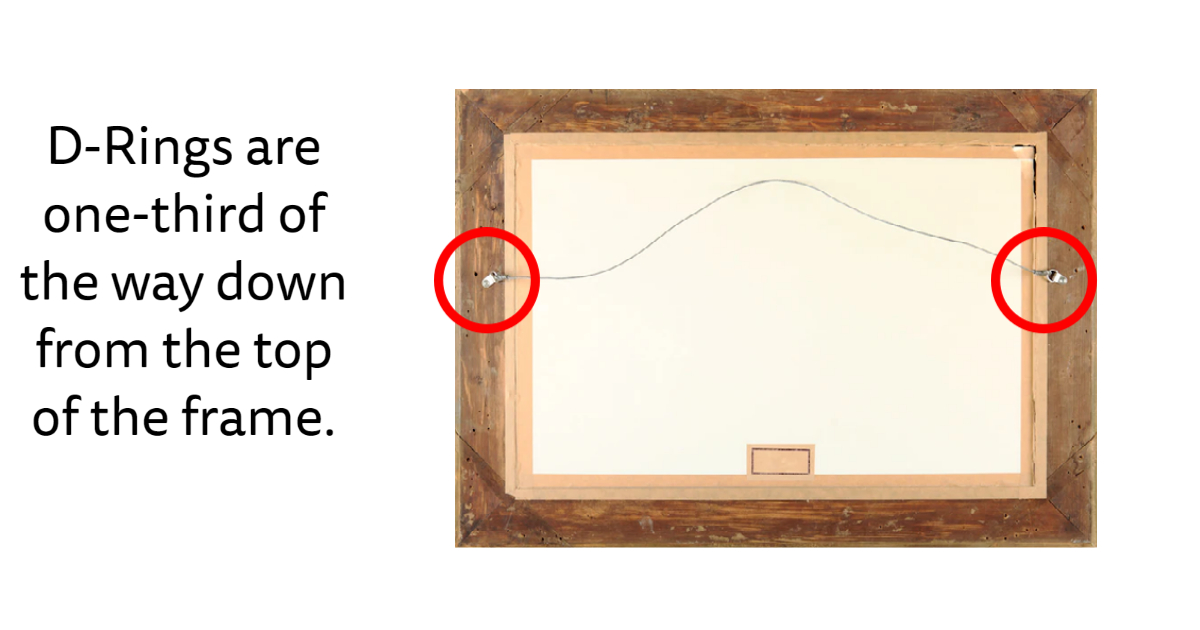
Example: If your frame is 12 inches high, then you would divide 12 by 3 in order to get 4 inches. So you would place a D-ring 4 inches down from the top of the frame. Do this for the other side.
Next, you’ll attach a picture wire. A good rule of thumb for getting the perfect wire length is to measure the picture’s width and double it. It might seem like a lot but you’ll be wrapping the wire a bit so it shouldn’t make the picture droopy.
Loop the wire through one of the D-rings with a few inches of excess. Loop it through the other D-ring and twist it until secure. Go back to the other D-ring and twist that one until secure. Cut off any excess on both sides.
You’re ready for the next step.
Picture Hangers
Picture hangers are a great option. First, you’ll mark where to put them with a pencil. You can either install one or two picture hangers.
If you’re going to go with one, then center it on top of the frame. Put the middle of the hanger in the middle of the frame. Use a level to make sure it’s completely straight. Put a pencil through the holes and color it in. Hammer your nails in. Make sure the nails aren’t too long or else they might stick through the picture. You can also drill in screws.\ \ If you’re going to use two, then you’ll want to make sure they’re level with each other. Use a measuring tape and a level in order to ensure that the picture will be centered and properly displayed.
4. Mark the Spot
You’re almost ready to put your picture up! Now you’ll need to mark where exactly on the wall it’ll be going.\ \ Use a pencil to mark a dot on the wall. You can use your measuring tape or level to put another dot if it needs more support.\ \ Hammer in your nails where you marked the spot.
If you’re doing a heavy piece, then use a stud-finder to locate a stud so that your picture will be stable. If you want to put a picture where there isn’t a stud, then you’ll drill a hole in the wall that can support a plastic anchor. Put your screw in it and either drill or use a screwdriver. Leave it protruding out a bit so you can hang the picture.
5. Hang the Picture!
You’re almost done! Simply lift the picture and put it onto the nail or screw. Put a level on top of the hanging frame in order to see if it’s straight.
Click here for a picture hanging set that includes everything you might need.
You can put more pictures around it or adjacent to it. Be creative and experiment!