Tie-Dyeing is a trend that started back in the 60s/70s! The trend stood the test of time. Tie-dye T-shirts are still everywhere and for good reason.
Tie-dye shirts are fun and easy to make. Making one could take up a few hours of your time if you’re looking for something to do. It’s especially fun to do with your friends or family.
Anyone could appreciate tie-dye shirts for their unique, bright patterns. They’re perfect for simple summertime outfits.
Read on to learn how to tie-dye a shirt in 6 easy steps.
Materials
Before you start creating your masterpiece of a shirt, you need to get some materials. Luckily, investing in the materials for a tie-dye tee isn’t too expensive. Plus, you’ll be able to reuse these materials for a long time to create a ton of shirts, bags, towels, and more.
Here are the materials you’ll need:
- A plain white T-shirt. Preferably 100% cotton but 50% cotton and 50% polyester should also work!
- Fiber-reactive dye. We included a link to a kit here but feel free to find your own.
- Soda ash. For dye mixing.
- An empty plastic squeeze bottle. An empty, washed-out bottle of ketchup or mustard should be perfectly fine.
- Rubber bands. To tie the shirt!
- Gloves. To protect your hands from getting stained.
- Buckets. To dip your shirts in dye or water.
- Sealable bags.* Laundry detergent.
- A workspace. Use cardboard or plastic bags to keep everything clean.
You could also buy a tie-dye kit on Amazon. We would recommend this kit from Tulip.
\ Now let’s go over the 6 easy steps you need to know to tie-dye a shirt!
1. Prepare Your Workspace
Your first step should be to prepare your workspace. Get all your supplies in one place. If you’re working on a table, be sure to cover it with cardboard or plastic bags to keep it from getting dirty.
We recommend doing this activity outdoors on some grass. This makes it easier to clean up after you’re done.
You should also be wearing old clothes. Or at least clothes you wouldn’t mind getting a bit messy. Some dye might splash onto your clothing and if you’re wearing a nice outfit, it won’t be fun.
Prewash your shirt with detergent and dry it.
2. Mix Your Dyes and Soak Your Shirt
If you decided to buy the tie-dye kit, then all you need to do right now is add water to the dye bottles and shake. The package instructions are clear and easy to follow.
For Procion dyes (most dyes fall under this category), it’s going to take a bit more effort. Put on your gloves and a mask if you’d like.
First, mix the dyes. To do so, you’re going to add 4 teaspoons of dye to a mixing bucket. Add a few teaspoons of warm water (about the same temperature as a baby’s bath) to the dye powder. Enough water to make a paste. Then add 1 cup of water to the bucket and stir it to dissolve the dye. Stir it enough to rid any lumps from being in the bucket. You can pour it directly into the squeeze bottles now. A funnel might make this part easier.
Set the bottles aside and prepare to make the soda ash solution. This part is essential for preparing the shirt’s cloth.
Add 1 cup of soda ash to 1 gallon of warm water. Stir it. Let it soak for about 15 minutes. Take out the shirt and wring it as thoroughly as possible.
3. Tie the Shirt
There are many different ways to tie your shirt, which will ultimately result in the pattern that is displayed.
We’re going to go over a basic spiral design.
Start by twisting the shirt in a clockwise or counterclockwise direction from the middle. Pinch it tightly or use a ruler and spin it.
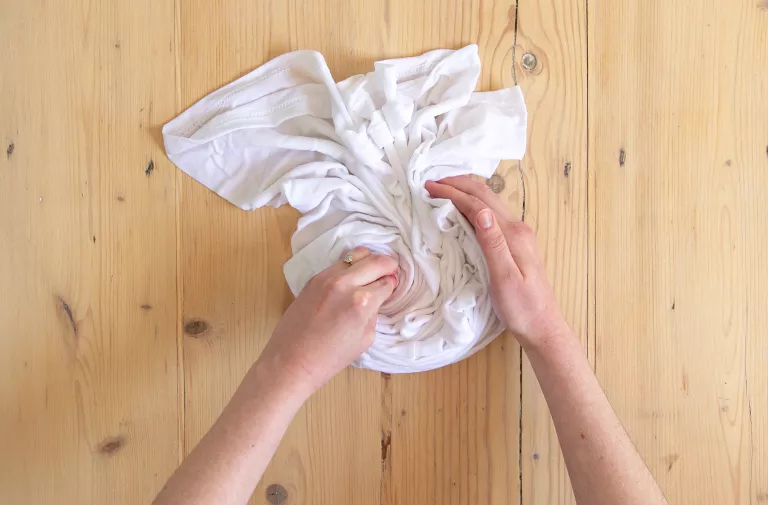
Keep twisting it and then use rubber bands to section off six sections. Use multiple rubber bands and keep them as tight as possible.
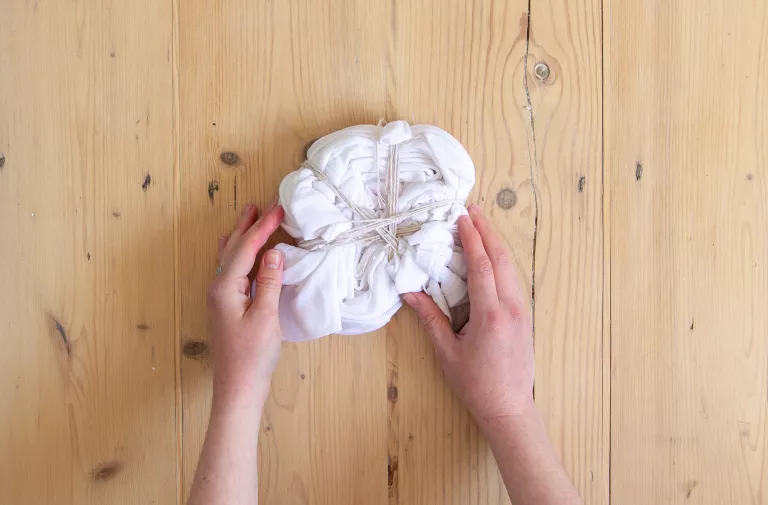
This is a simple, basic design to start off with. But there are many other designs you can do, so experiment!
4. Dye the Shirt
There are different ways to apply the dye. You can dip the shirt into buckets of dye or use paintbrushes. The best way is arguably the squeeze bottles. It’s easy to control and releases a nice amount of dye.
If you want more pastel colors, add more water to the dye mixture.
If it helps, keep a color wheel handy. Refer to it before placing colors next to each other. Also keep in mind that the rubber bands aren’t exactly steel walls. The colors placed next to each other will bleed into each other and combine.
5. Put the Shirt into a Plastic Bag
Now you need to let the dye set. Don’t take off the rubber bands. Place the dye into a sealable bag and seal it up. Make sure it’s fully closed.
Put the bag aside and let it dry for 24 hours.
6. Unveil Your Masterpiece!
The shirt is almost ready to be worn and make an impression!
First, take the shirt out of the bag and rinse it under cold running water. It’s best to do this in a bathtub or outside as it’s going to make quite a mess. The water is going to look very dark and that’s completely normal. Keep rinsing until the water turns clear.
Then you’re going to wash the shirt normally. We recommend washing a fresh tie-dye shirt by itself. Then it should be ready to wear!
For the next couple of washes, keep it by itself. We wouldn’t recommend throwing it in with other colors until the 3rd or 4th wash.
Keep Creating!
Now you can keep creating shirts and experimenting with other designs.
No plain white shirt is safe now…
But you can also dye other things! Like bags, socks, towels, and more.