Tumblers are a great way to take your drink with you on the go. People love to decorate their cups so that they can show off their personality and their interests.
Glitter is a great way to make your tumbler so much more attractive. Decorating your tumbler with glitter could give it a special look. This could even have positive effects on your health by encouraging you to drink more water!
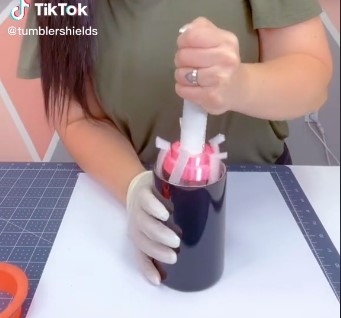
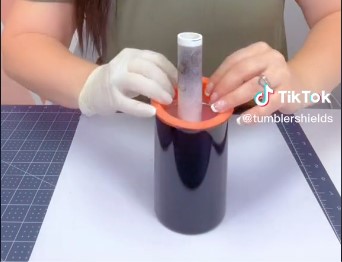
We’re going to be using screenshots from @tumblershields on TikTok as reference. Click here to check them out and show them some love!
Knowing how to make a glitter tumbler will let you make something special. Read on to learn how to make a glitter tumbler in 7 easy steps.
Supplies
Before we get started, you’re going to need some supplies.
First, you’re going to need a tumbler (obviously). If you already have one, great. If not, then we’d recommend this one from Amazon. Your cup is going to look great if it doesn’t have anything sticking out. A lot of cups have tactile logos or words, which could ruin the clean look we’re going for.
Secondly, you’re going to want to grab something to hold your tumbler in place. You can use anything you find around the house. Just as long as it can hold your tumbler from the inside. However, we’d recommend this holder from Amazon. With it, you can hold your tumbler from the inside easily so that you can decorate without any distractions.
Thirdly, you’re going to need a tumbler protector. These go on the rim of your cup while you’re decorating. They block off anything from getting on the rim or inside of the cup. If you don’t protect your cup’s rim, you might get glitter inside or you could even get glitter inside of your mouth once you take a sip. Thankfully, these protectors will allow you to decorate with peace of mind.
You’re going to need glitter, too. Try to get non-toxic glitter. You can decide on whichever colors you want. Feel free to get multiple colors. Whatever you think will look great!
Finally, you need glue. The glitter will stick on the cup with glue so it’s important that you get reliable glue. You should get this glue from BEACON on Amazon. This permanent adhesive will bond your glitter to the cup. It’ll make your glittery tumbler last a long time.
Step One: Prepare
Prepare your workspace and supplies. You should do this with paper laying flat on your workspace or outside on the grass. Things might get messy and taking these precautions will make clean-up a lot easier.
Gather all your supplies and wear some comfy clothes. You’re ready to get started!
Step Two: Clean Your Tumbler
Now that you’re ready to get started, you’re going to clean your tumbler. Rid it of any dirt and grime. The glue won’t be effective if it’s sticking to a dirty cup. Thoroughly clean the outside of the cup with soap and water. Dry it with a clean washcloth and let it air dry for a bit.
Step Three: Insert the Tumbler Holder
Next, you’re going to want to insert something into the tumbler that’ll hold it in place without touching the outside. We recommended a tool earlier that’ll work perfectly for this but if you find another solution then it should be fine.

The holder shouldn’t touch the outside as that’ll only make it harder to get the project done.
Step Four: Put on a Tumbler Protector
After that, you’ll put on a tumbler protector to keep glue and glitter away from the rim and the inside of the cup. If anything gets on the inside, you risk taking a sip of some glue or glitter the next time you take a drink. It’s best to keep everything on the outside only.

Step Five: Apply Glue
Now you’re going to apply glue to the outside of the tumbler. Apply the glue directly on to the cup. Try to cover the whole surface. If you think it’ll help, consider putting on some gloves and lathering the cup with glue. Drop some glue on the cup and lather it from there.
It’s important to cover the whole surface so that you can get the glitter to stick from all sides.
Step Six: Give it Some Sparkle!
You can finally put some glitter on the cup. Try to do this shortly after you apply the glue. The sooner you put it on, the better. Sprinkle some glitter wherever you want. Don’t be afraid to go crazy with it!
Experiment with different colors. Or keep it simple. Whatever you think will make it look beautiful!
Use the tumbler holder from earlier to twist the tumbler around while you sprinkle some glitter on. This makes it a lot easier to rotate the thing while sprinkling your glitter.
Step Seven: Let it Dry
You’re almost ready to take this with you and show it off. You just have to let it dry for a few hours. Use the tumbler holder to keep the cup away from directly touching any surfaces.
Once it’s dry, feel free to remove the protector and holder. You can finally put your favorite drink into the tumbler and take it with you wherever you go!
Conclusion
Decorating your tumbler with glitter is a fantastic way to express yourself. It might even encourage you to stay hydrated.
Now you know everything about giving your cup a glow-up, from keeping glitter out to keeping it stuck on the outside.
Don’t be afraid to get creative with your tumbler! Who knows, you might even start a collection of beautiful cups that you created.