Some would call it daunting, some might call it difficult. But we say, it is super easy and nothing but coloring with threads! Yes, we are talking about nothing but embroidery and we are here to tell you that whatever scary notions that you had about embroidery are absolutely false. One of the most beautiful and oldest sewing is hand embroidery and we are here to tell you everything about it, in other words, Embroidery Types, Tools, Stitches, and Techniques.
It shouldn’t come as a surprise that many people think of embroidery as a difficult task like climbing a mountain. Mostly because one glance at the embroidery and you would think that something this beautiful must be really difficult to create. But that is not the fact at all. The only thing you should be worried about is lots and lots of practice. And yes, as a beginner it might seem a little difficult but soon you will realize your worry was for nothing.
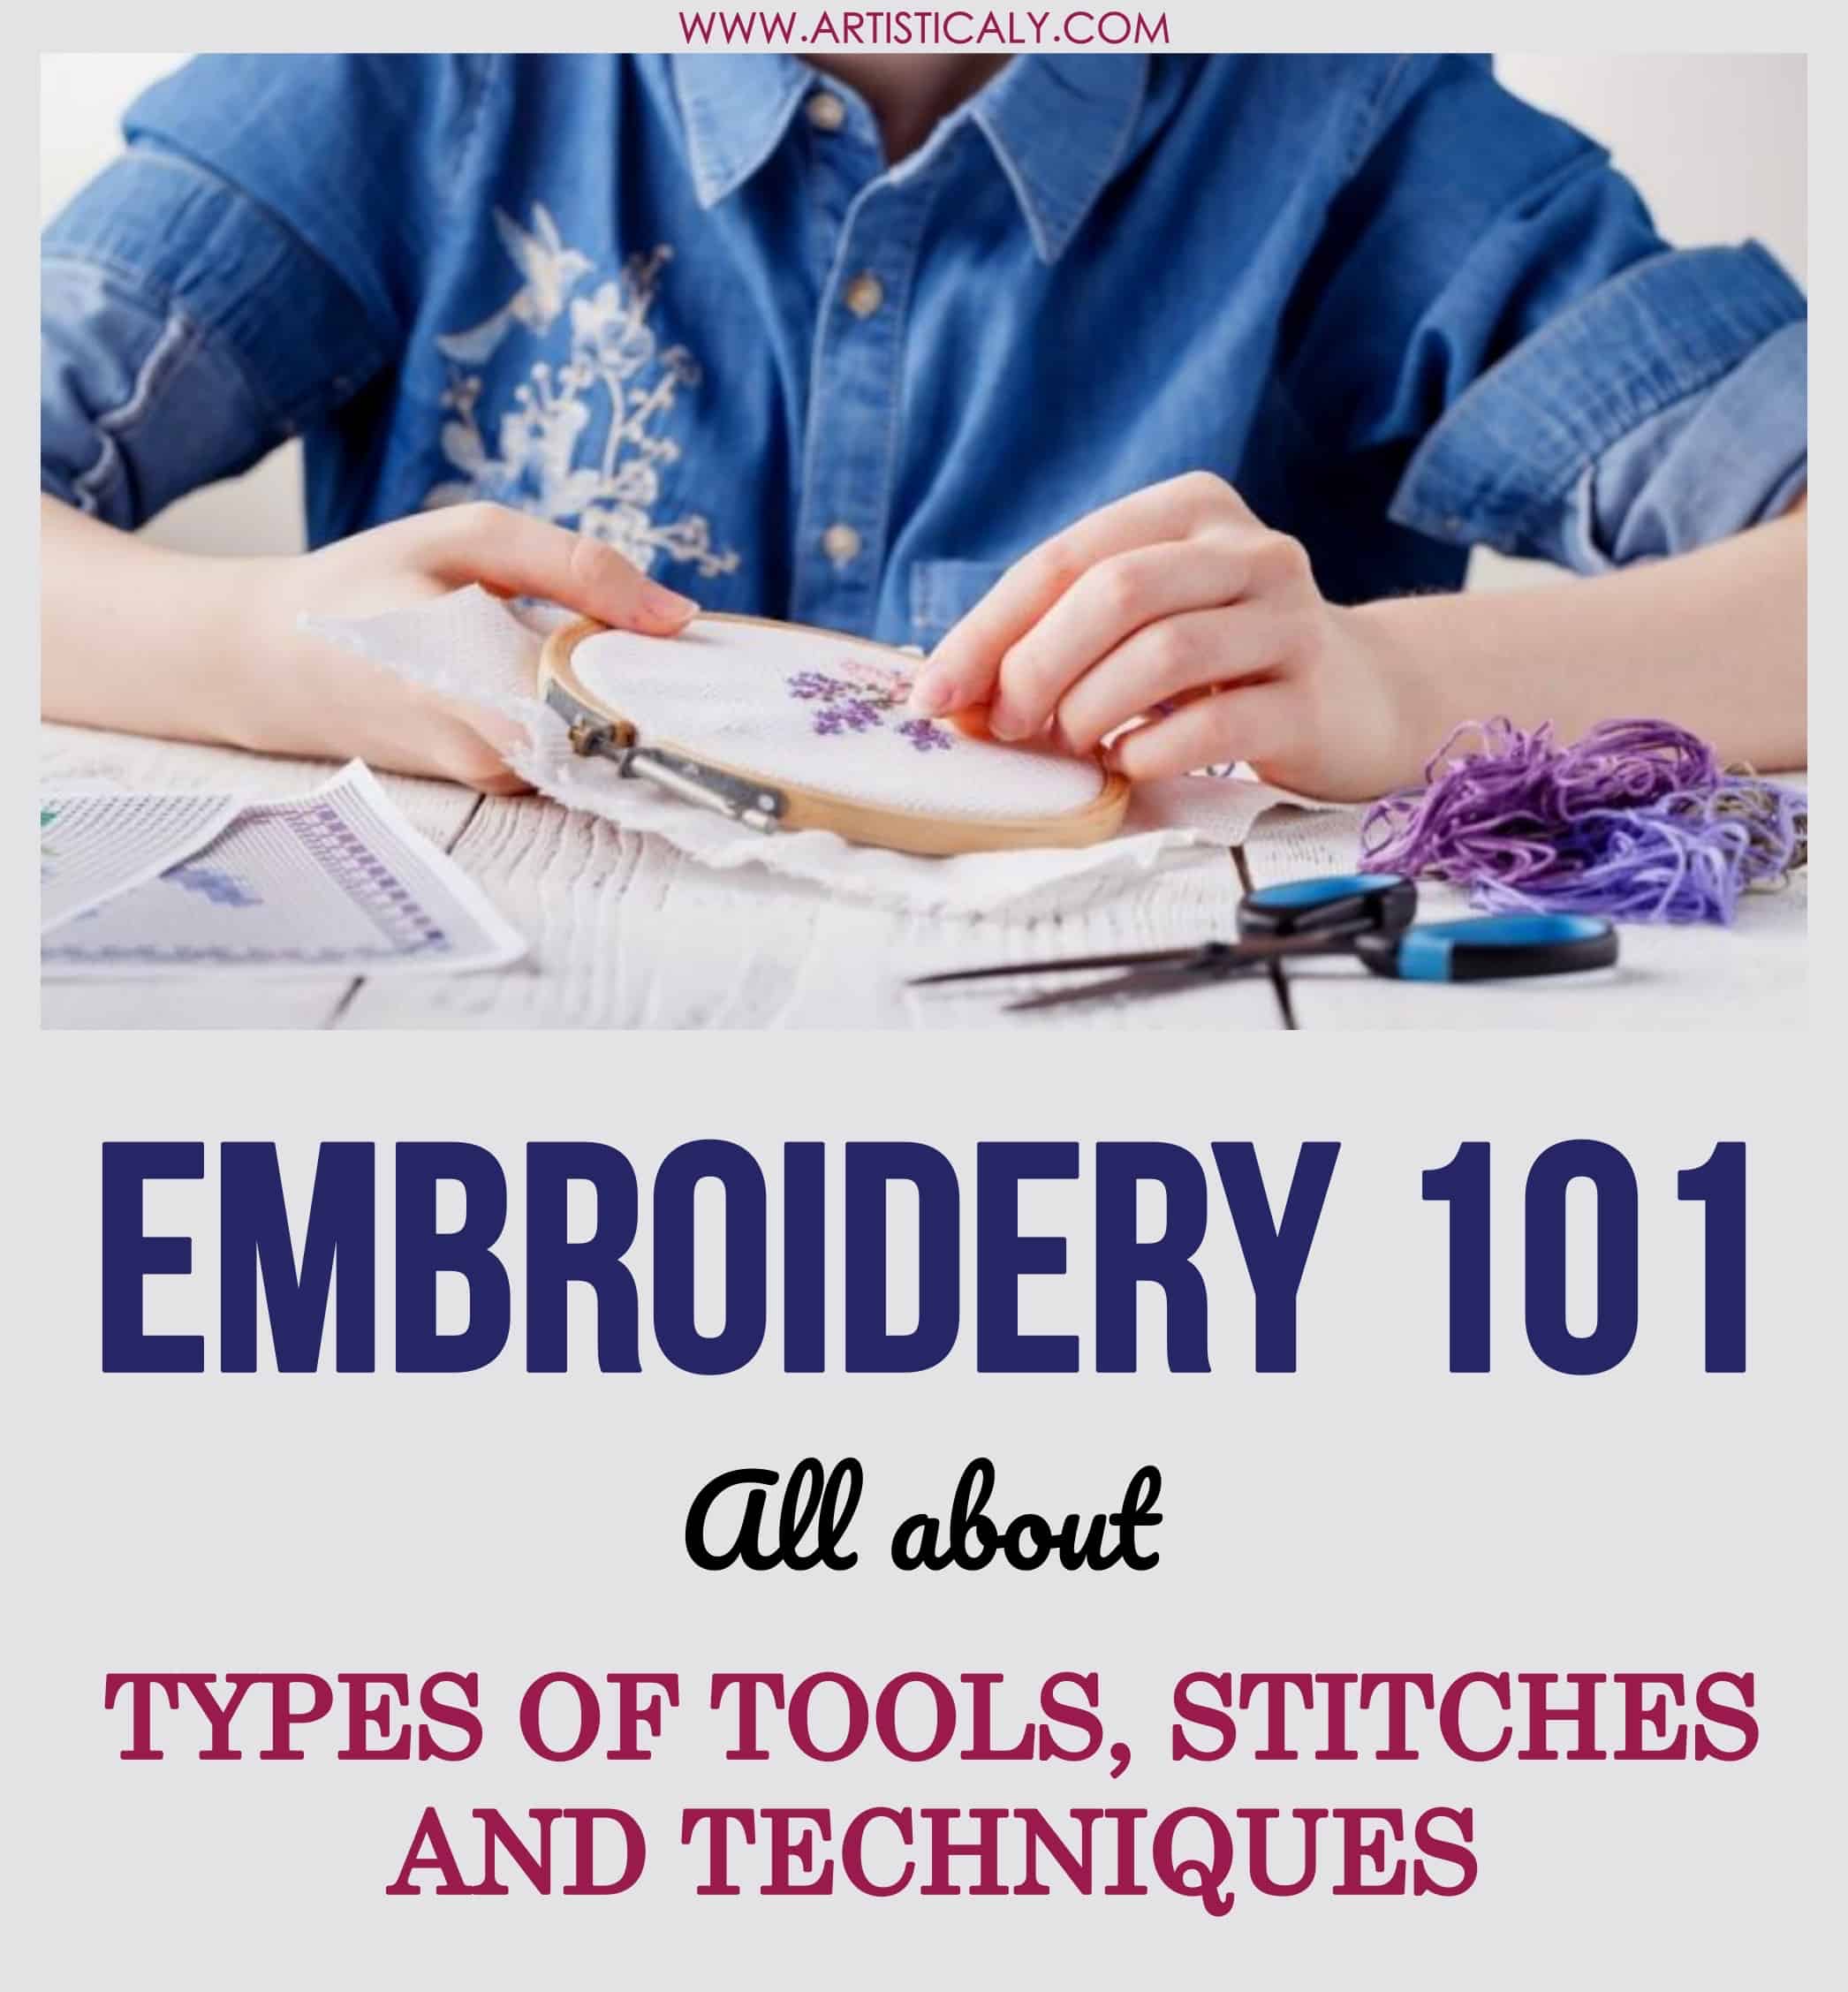
Embroidery 101 - All about Types of Tools, Stitches and Techniques
The Items You Need for Embroidery
Before we start about the basic stitches and techniques, you need to know the basic items you will need to get started with embroidery.
Embroidery Needles
If we start firing off the list of embroidery needles, you might run away for hills. Wink! But don’t run just yet. There are basic embroidery needles of medium length having a sharp tip and long eye, which you will get easily in a craft store or online which will get your embroidery done.

Once you are hooked, you can experiment with the different types of needles like:
- Milliner’s Needle: Also known as straw needles (some might also, call them as crewel needles), it is mostly used for wrapped stitches like French knots or bullion knots.
- Chennile Needles: The only difference in chennile needles and normal embroidery needles is that these have very thin long eye and these are wider in width and smaller in length.
- Tapestry Needles: With a blunt tip and much longer eye, tapestry needles are used mostly for cross-stitch, wool embroidery, etc.
- Beading Needles: As the name suggests, these needles are used for sewing small beads.
- Darning Needles: Having a small eye and being longer in length than any other needles, darning needles are used for darning, running stitch embroidery and huck embroidery. There are also huck embroidery needles specifically used for huck embroidery.
Embroidery Hoops and Frames
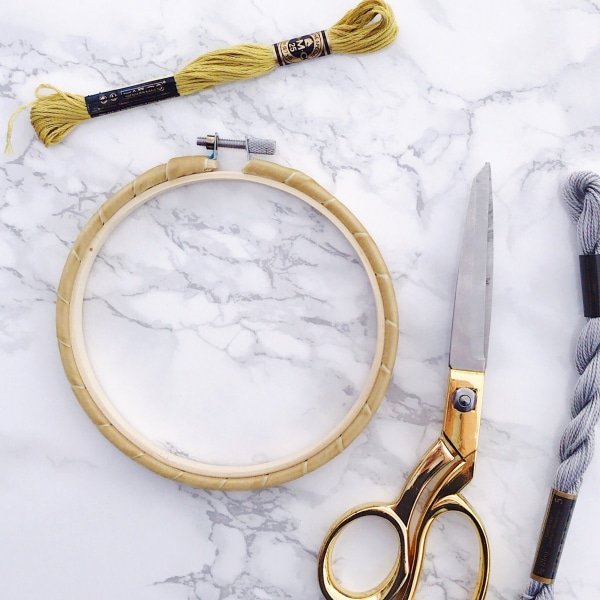
For doing flawless embroidery, it is essential to use an embroidery hoop which will stretch your fabric in just the right way for you to work your needles through it. You will find a variety of options for embroidery hoop and frames such as round hoops, square hoops, oval hoops, triangle hoops, plastic hoops, embroidery hoop with a stand, etc.
Embroidery Scissors
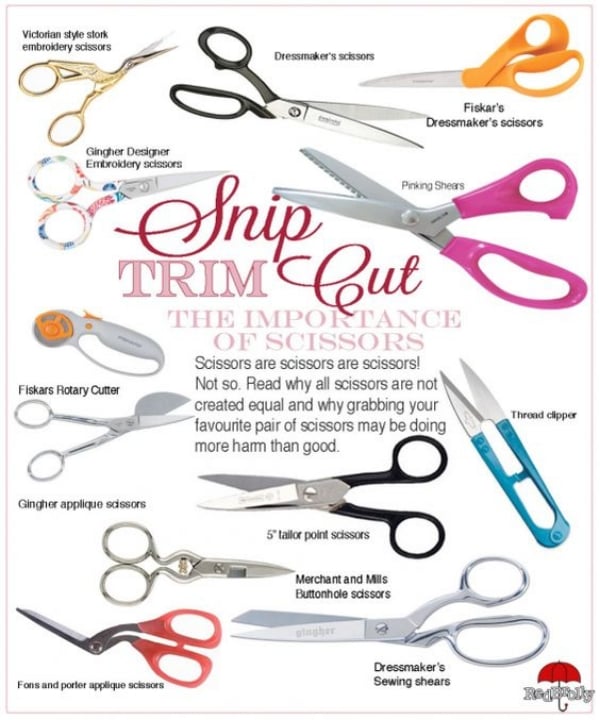
As long as you have a pair of simple embroidery scissors which will snip the threads, you are good to go. However, there are a few more types of scissors that will come handy for different purpose like:
- Straight Tip Scissors
- Curved Type Scissors
- Double Curved Scissors
- Applique Scissors
Some of the most popular scissors used for machine embroidery are:
- Fiskars Razor Edge Fabric Scissors
- Precision Cut Embroidery Scissors by Madeira
- Embroidery Scissors by Kai
Embroidery Threads

There is a plethora of options when it comes to embroidery threads. The ideal choice for a beginner of the embroidery will be silk threads which are soft and fine and give your work the perfect touch of sheen. The other types of threads that you can go for are:
- Pearl Purl
- Bullion Threads
- Torsade Threads
- Matte Embroidery Threads
- Wool or Crewel Threads
- Satin and Rayon Floss
- Persian Yarn
- Cord and Beading Threads
- Crochet Threads
- Ribbons
As long as you have colorful bundles of threads, you are good to go with any of the above types of embroidery threads.
Fabric of Your Choice
Any fabric would work for embroidery but if you crave perfection then it is better to choose a fabric which will work well with your design and thread. The different types of fabric for embroidery are:
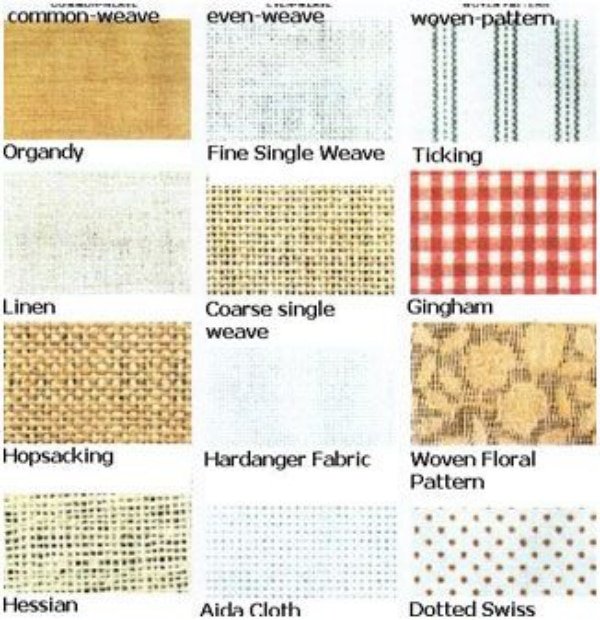
- Cotton: It is one of the best fabrics for a beginner to start embroidery. You can also go for cotton blends with natural fibers like linen.
- Linen: Though this fabric is quite delicate to handle, you would get hooked on it once you start using linen. If you still fear that it would stretch then opt for tighter weaves and 100% linen.
- Denim: You could embroider yourself on your denim jeans, skirts or jacket once you master the art of embroidery and get a DIY embroidered denim item.
- Wool: For embroidery, you need fabrics that wouldn’t stretch easily and wool definitely makes it to that list. Some fuzzy textured wool can be a little difficult to work on but the end result will definitely be worth giving wool a try.
- Burlap: You could transform the whole look of plain burlap but there will be some challenges as it frays easily. Combine it with some other fabric or consider embroidery threads like tapestry wool.
- Aida Cloth: Aida cloth is a fabric that has a grid of holes; therefore it is mostly used for cross-stitching. A little work of other stitches would also be fine but go for this fabric only when your main choice of the stitch is cross-stitching.
Besides these fabrics, you can get more creative and try exploring embroidery with other fabrics like velvet, organza, flour sack towels, duck cloth (also known as canvas), etc. It would be surprising but you can also try embroidery on items like canvas shoes and bags, t-shirts, etc.
Other different tools and materials that will come in handy for embroidery are drawing materials like pencils, chalks or pens, needle threader, tracing paper, ribbons, punch needles, tweezers, pinking scissors, ruler and tape measure, etc. Start embroidery with notebooks by first creating your designs on paper with pen and then jump to the thread and fabric. Also consider having embroidery books like Hand Embroidery Basics by Florence Schultz, Kate Haxell’s The Stitch Bible, Needlepainting Embroidery: Fresh Ideas for Beginner’s by Trish Burr, etc. These books will help you excel at embroidery in a great way.
Types of Embroidery Stitches and Techniques
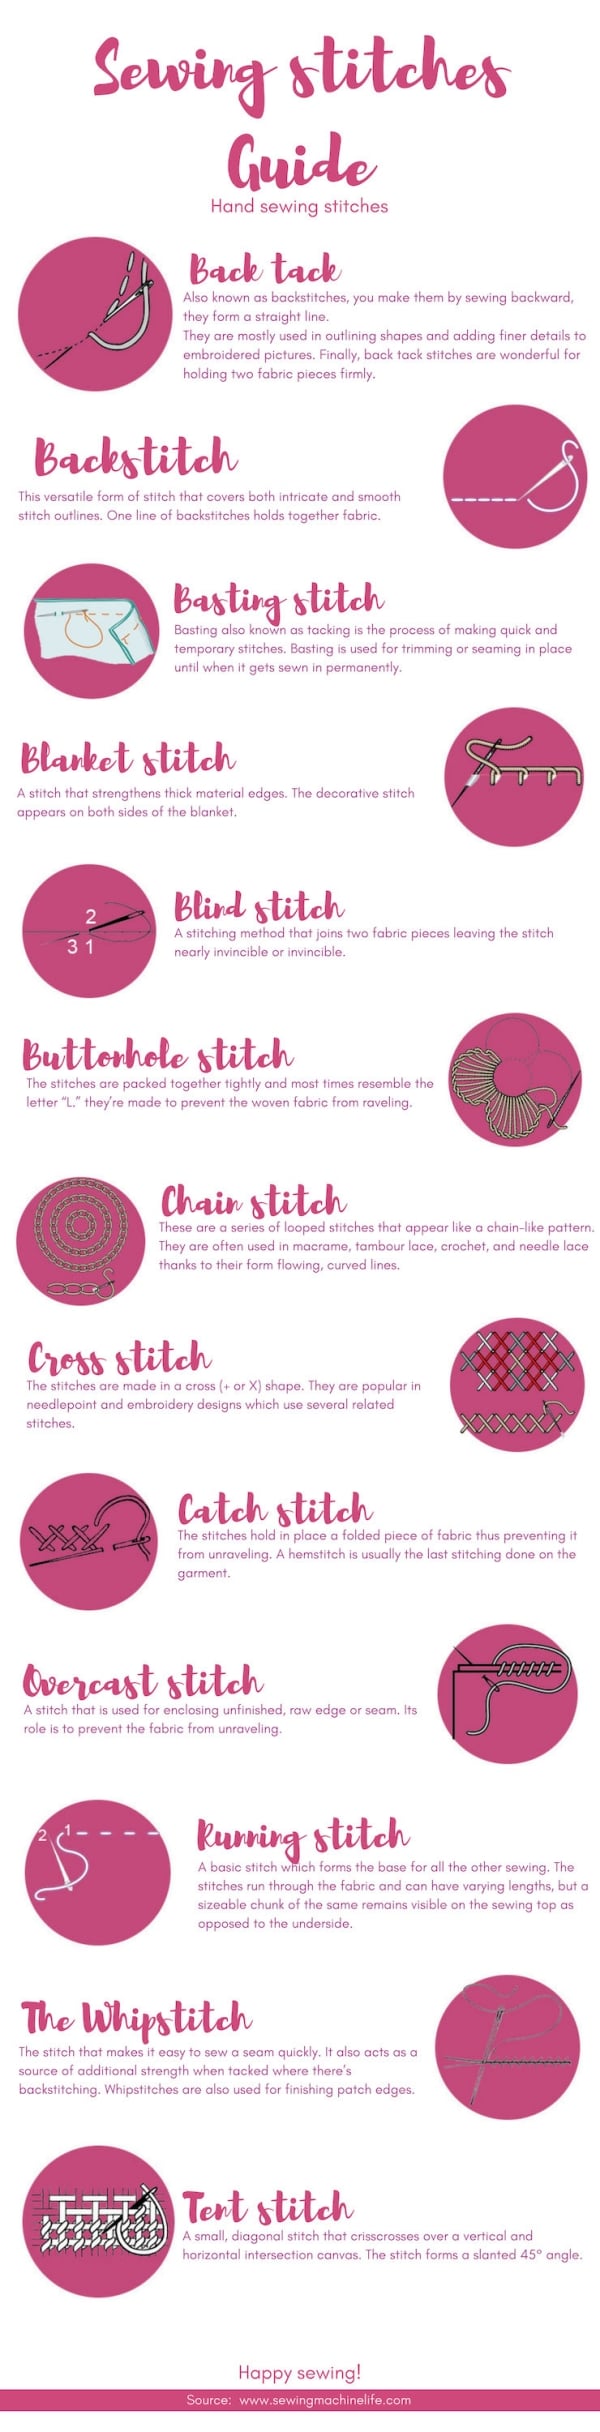
One thing for sure is that you will never run out of embroidery stitches to play with. There are that many of them. But for a beginner, you should start with some of the basic stitches before you plunge yourself into other embroidery stitches which are more complex and difficult.
1. Running Stitch
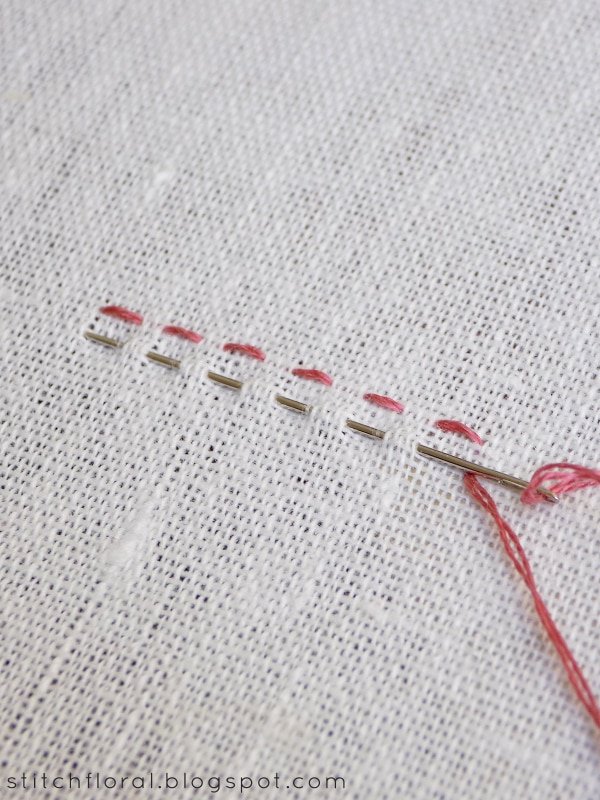
Also known as straight stitch, running stitch is mostly used for creating outline of an embroidery design. It is the easiest of all the stitches.
- Start from the back of the fabric and bring the needle through the fabric to the front.
- Then after creating one stitch forward, push the needle through the fabric to the back.
2. Back Stitch
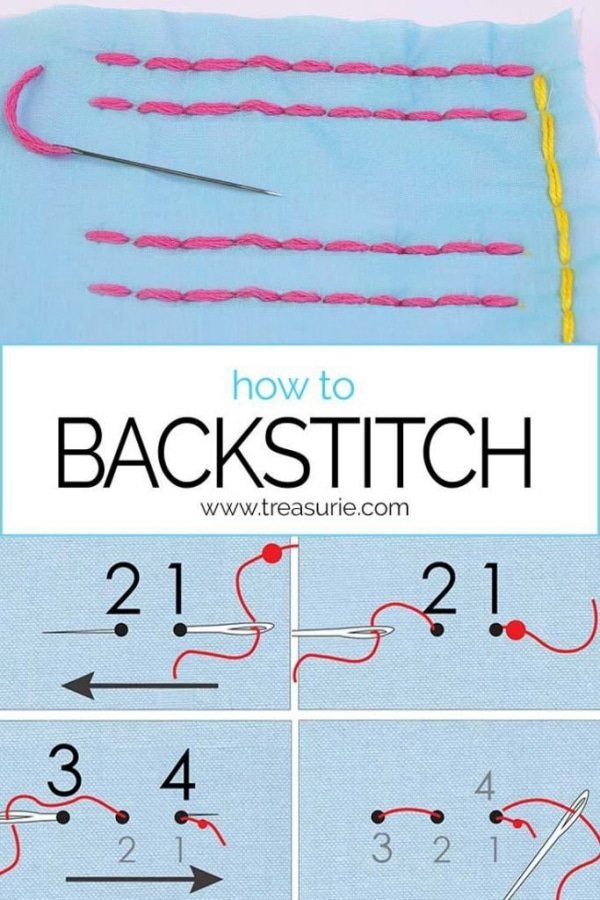
It is another stitch mainly used for outlining a design or when you want to create a solid line.
- Bring your needle through the fabric to the front and take a stitch forward of length as per your choice.
- Push the needle back through to the fabric and bring it up to the front.
- Now rather than taking a stitch forward, make a stitch backward.
3. Split Stitch
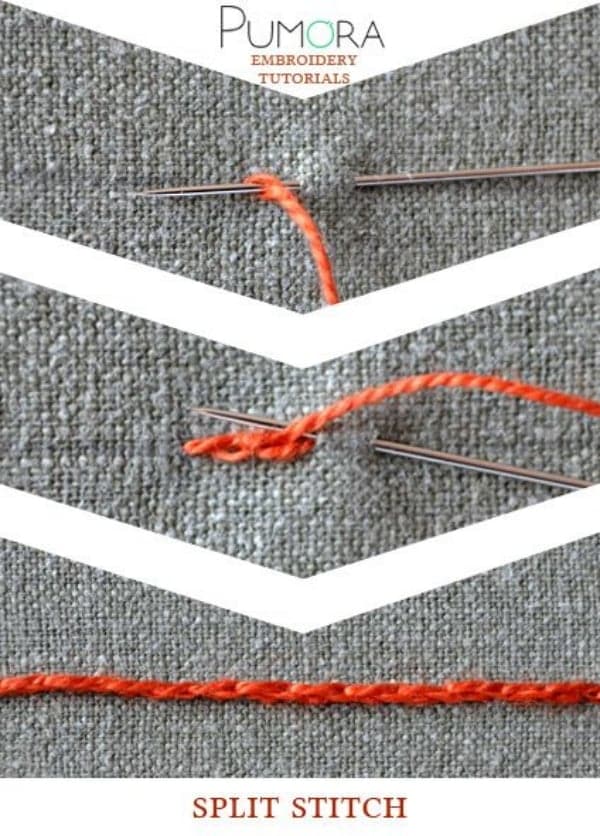
Though similar to back stitch, split stitch got a braided texture which makes it look pretty rather than simple and boring for creating outlines, especially floral outlines.
- Start similarly by bringing needle to the front and taking a stitch forward.
- While coming back to the front from the back again, bring your needle up through the center of the previous stitch.
4. Stem Stitch
As the name suggests, this stitch is used for creating flower stems and leaves.
- Create a stitch forward as similar to the split stitch.
- Bring the needle back to the front from the side of previous stitch rather than splitting the stitch from the center as we did earlier in split stitch.
5. Satin Stitch
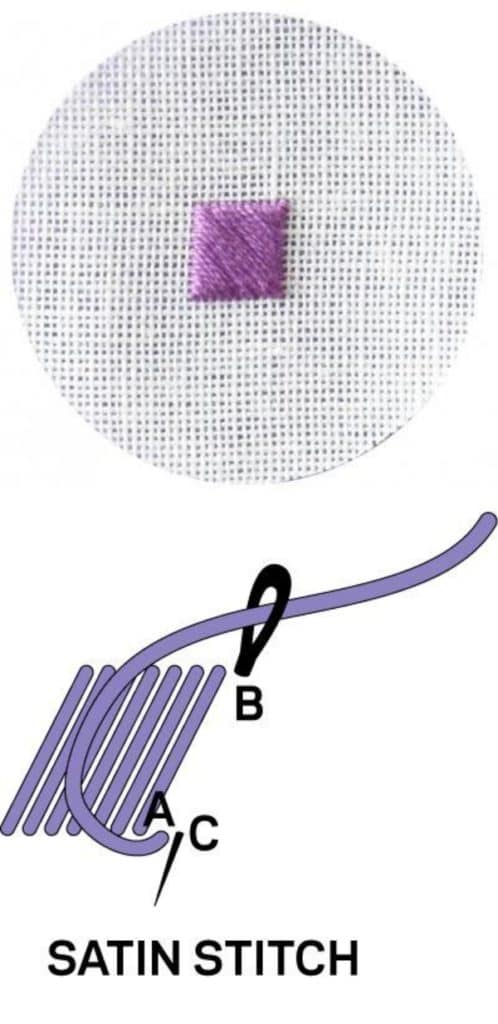
Kind of like filling colors, sating stitch is used to fill up a design. It is easy to get done and adds a nice smooth texture to your design.
- Draw a design that you want to create with embroidery.
- Make an outline using any of the stitches that we talked about earlier.
- Next bring your needle to the front from one end of the shape and create a stitch by pushing it back from the other end of the design.
- Keep stitches close to one another.
6. French Knot Stitch

French knot is just what the name says, it is a knot! Not just you can use French knots for creating fine details such as eyes but it also works well when you want to fill up smaller designs or shapes.
- Start by bringing the needle to the front from the backside.
- Wrap the thread around the needle twice and then push it back through the fabric right next to the point where it came from. Make sure you hold the thread taut but not too tight while piercing the needle through the fabric to backside.
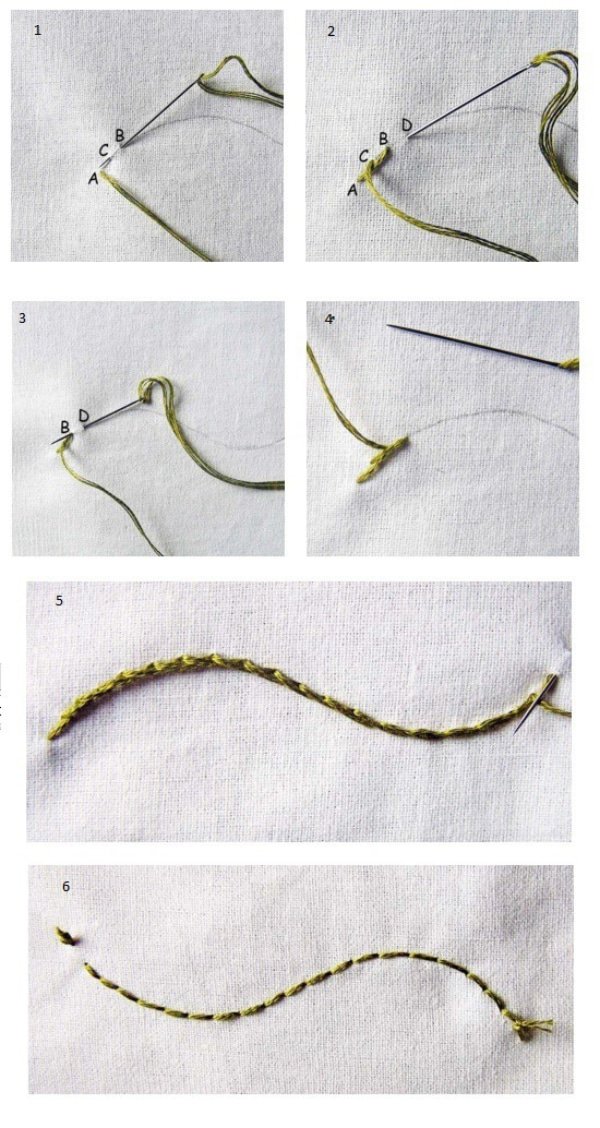
7. Chain Stitch
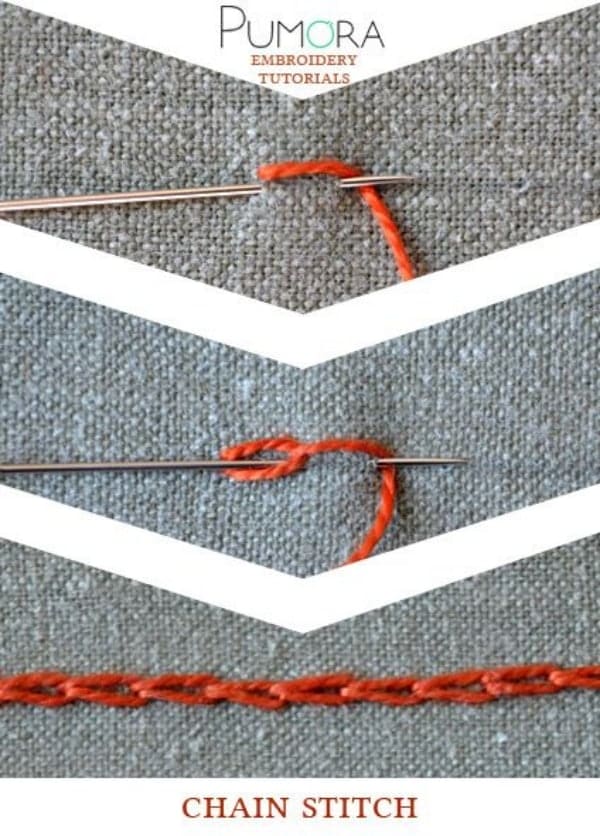
Just like a chain, the chain stitch looks like a row of linked stitches. And yes, it looks quite difficult to create but you can learn it quite easily.
- Bring your needle up through the fabric to the front.
- Push your needle down to the back through the same hole but make sure you keep a loop up there and not pull the thread completely.
- Go one stitch forward in the back and bring the needle up through the center of the loop.
- Don’t pull the thread again completely and push it down back through the same hole.
8. Lazy Daisy Stitch
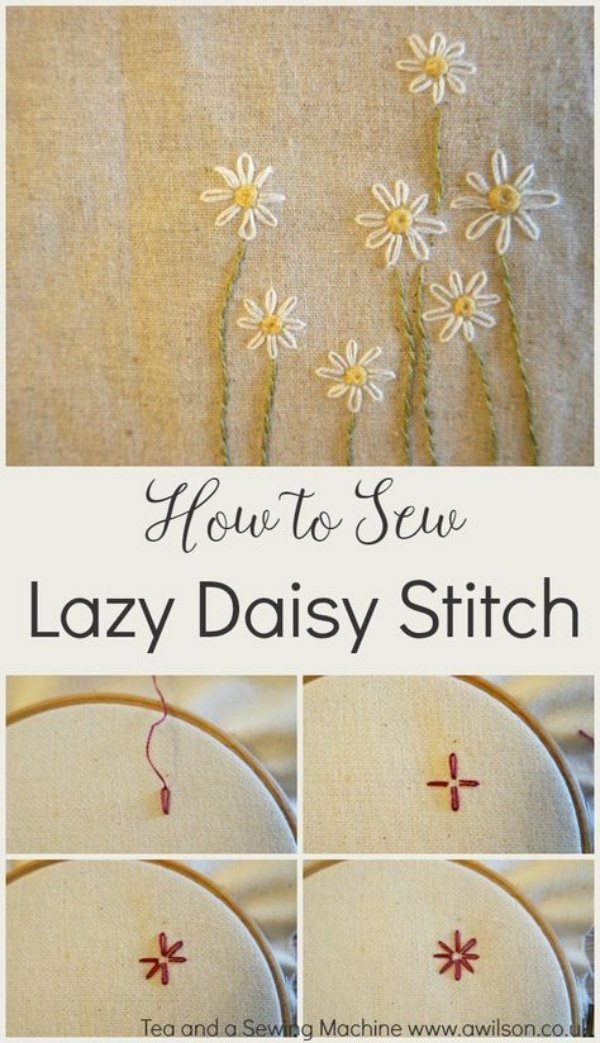
Mostly used to create floral and petal patterns, lazy daisy stitch is created by making a loop and then a small stitch just over the end of the stitch which looks like a daisy petal.
- Similar to the chain stitch, bring the needle up and push it back through the fabric and make a loop.
- Bring the needle back to the front through that loop and create a small stitch over the top of the loop.
9. Feather Stitch
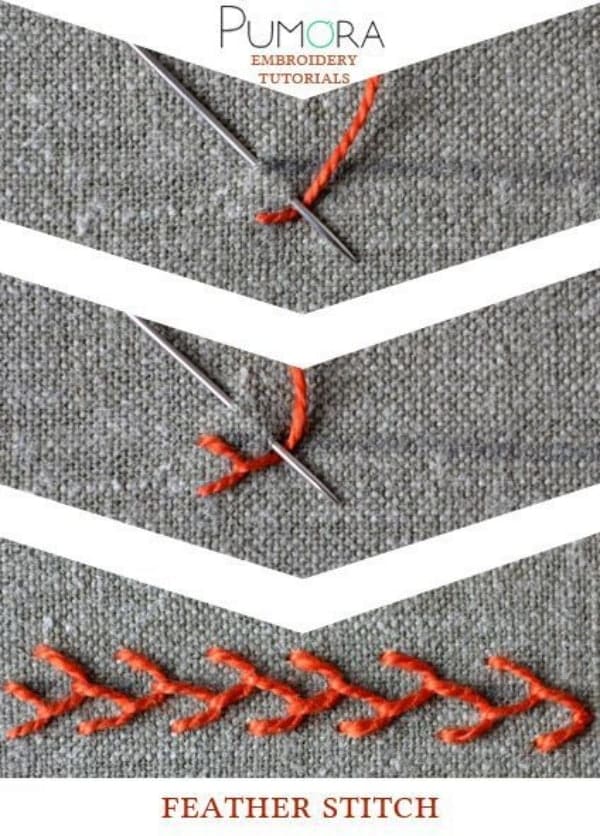
Something different and definitely lovely, feather stitch is also called a single coral stitch. It is used to create borders, leaves, branches and vines.
- Draw four parallel lines so that it can be easier for you to create feather stitch.
- Bring the needle to the front from the second line and create a running stitch by pushing it down through the fourth line but don’t pull the thread completely and make one loop.
- Bring the needle up through that loop from the third line and create a straight stitch again but this time with the first line. Again make a loop and bring the needle up through the line in between.
10. Herringbone Stitch
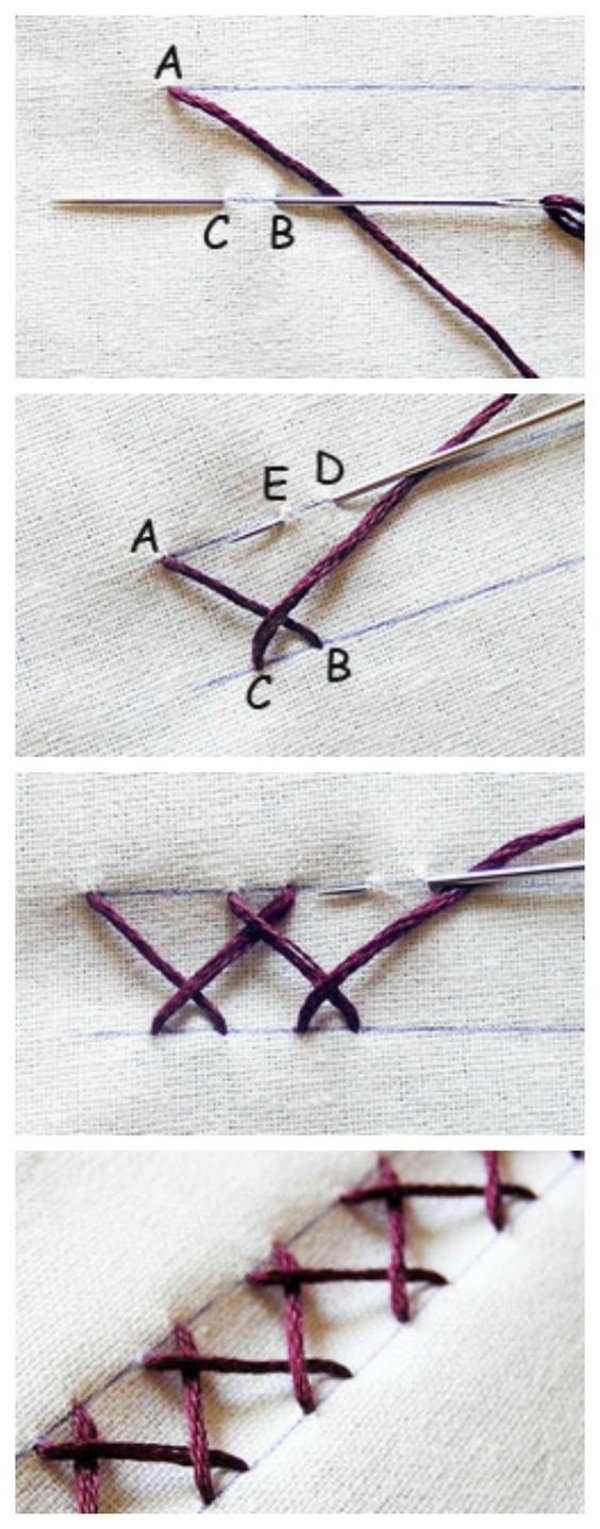
Call it a witch stitch or catch stitch or plaited stitch, herringbone stitch is one of the most common stitches used and forms the base for many embroidery arts.
- Start by drawing two parallel lines.
- Bring the needle up through one line and push it down to the back after creating a tilted straight stitch.
- Bring the needle to the front from the side of the hole you just pushed it through and create a tilted straight stitch by pushing it down from the first line such that the straight stitches form a row of linked crosses.
11. Seed Stitch
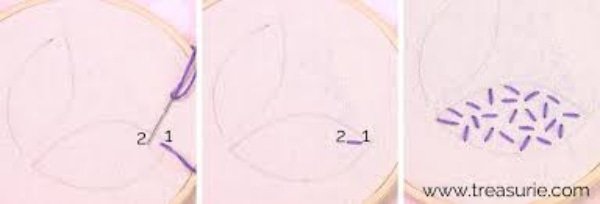
It is similar to running stitch and just looks like tiny seeds, hence the name. This stitch is mostly used for filling a design or pattern and it is also known as rice grain stitch.
- Bring the needle up to the front and push it back after creating a small straight stitch.
- Bring the needle up again but from a different angle and make another tiny straight stitch.
- Continue making such stitches until you cover up a pattern or shape. The end result should look like scattered seeds.
12. Woven Wheel Stitch
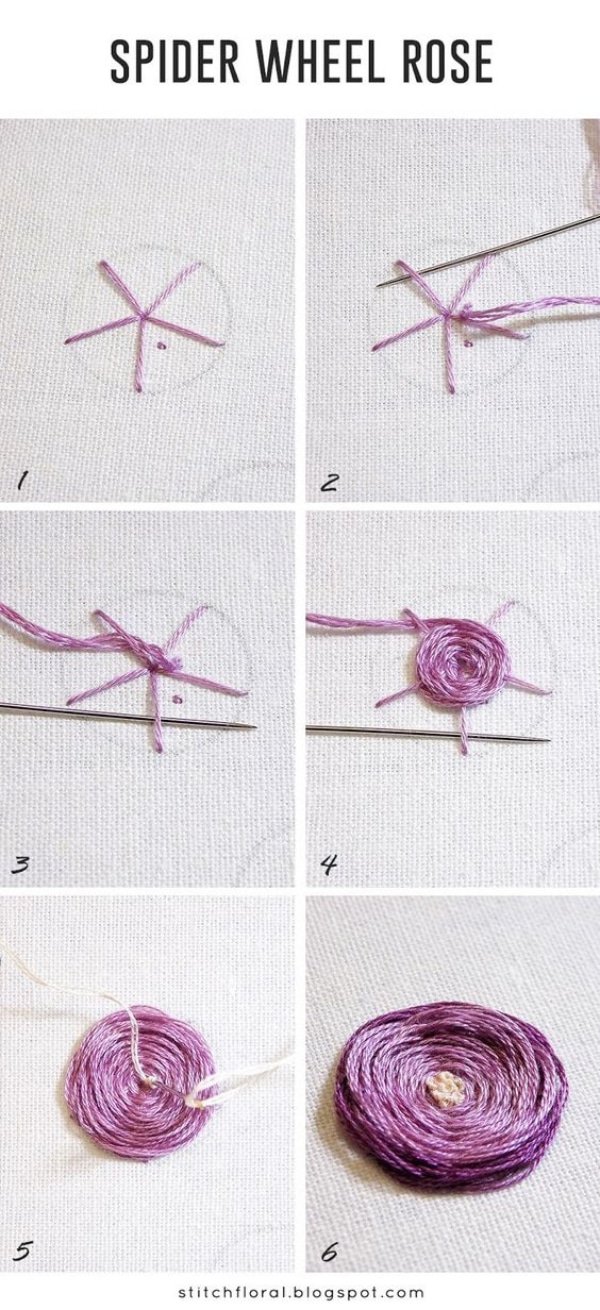
It looks as complicated as a rose and that is why it is also called a woven rose stitch. It is the perfect stitch when you are in the mood of creating blooming roses with embroidery. The good thing is it just looks complex but in reality, it is very easy to make.
- Start with a lot of thread since this stitch requires a lot of floss.
- Draw a star of straight odd lines, preferably five and not less than that.
- Bring the needle up from the end of one line and push it back through the center.
- Repeat the steps for all the lines.
- Once you have created straight stitches with all the lines to form a wheel, bring the needle up from near the center and then you need to go with a weaving pattern all around the wheel.
- Pull the needle around by weaving it over and under the lines alternatively.
While these stitches are just a few, there are a lot many of them for you to practice once you get the hang of embroidery. Once you pick up the needle and fabric, you wouldn’t let go of it, embroidery is that relaxing and fun to work with. Just make sure you squeeze in some time for it daily and practice a lot.